iPad Air, iPad with Retina Display, iPad 2 and iPad Mini with Retina Display, iPad Mini
Tips:
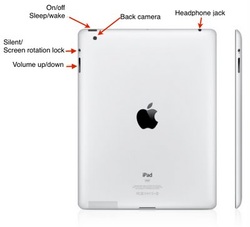
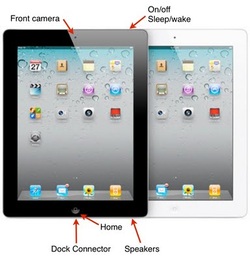
Turn On - Press On/off button
Turn Off - Hold down On/off button and slide on screen switch to off
Take a Screen Shot - Hold down Home button and On/off button simultaneously. Screen shot will go into photos.
Mute Switch - Slide Silent/Screen rotation lock. Set this switch in Settings.
Turn Off - Hold down On/off button and slide on screen switch to off
Take a Screen Shot - Hold down Home button and On/off button simultaneously. Screen shot will go into photos.
Mute Switch - Slide Silent/Screen rotation lock. Set this switch in Settings.
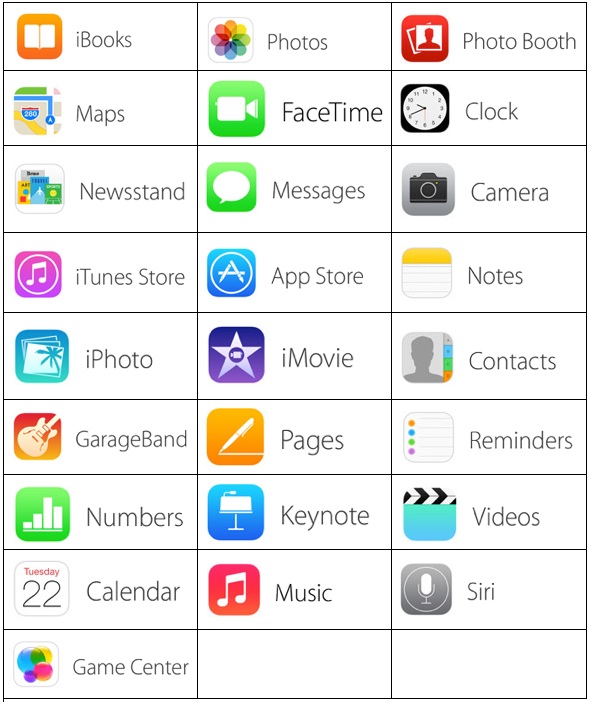
Built-in Apps
iTunes
Apple's App Volume Purchase Program
Helpful Tips:
iPad Mirroring
iPad to Computer to Interactive White Board (via VGA Projector)
Reflector App
iPad to Apple TV to Interactive White Board (via VGA Projector)
Apple TV Mirroring
ATV Pro - Kanex ATV Pro allows a VGA projector to use Apple AirPlay mirroring from an iPad to Apple TV, so you don't need an HDMI connection. Your speakers plug into the ATV Pro for sound.
Computer/Screen to iPad (via VGA Projector)
Splash Top App
Splash Top Streamer
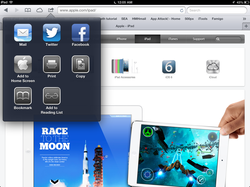
How to add a bookmark:
In Safari, click on the "little box with an arrow" next to the address bar, you can add a webclip (shortcut) to either the home screen or as a bookmark to the Safari browser. This can be handy to access websites you frequent often.
In Safari, click on the "little box with an arrow" next to the address bar, you can add a webclip (shortcut) to either the home screen or as a bookmark to the Safari browser. This can be handy to access websites you frequent often.

How to save a picture into your Photo App:
When you're browsing around the Internet and find a picture you like, tap and hold the picture and you'll be prompted with a "Save Image" and "Copy" prompt. By selecting the "Save Image", it will download the image to your iPad in the "Saved Pictures" album in the Photo App.
When you're browsing around the Internet and find a picture you like, tap and hold the picture and you'll be prompted with a "Save Image" and "Copy" prompt. By selecting the "Save Image", it will download the image to your iPad in the "Saved Pictures" album in the Photo App.
Portrait vs. landscape mode!
Often times, certain features of some applications will have a different layout whether you're looking at it in portrait or landscape mode. I've noticed, while in Pages, that some features weren't present in landscape mode (which is easier for me to type on) that were available in the portrait mode. Key point: try both ways to see if it's something that is hiding from you!
How to take a screenshot of the iPad screen:
This can come in very handy when you need to share something with people who don't have access to see your screen. By holding down the home button (the only button on the front of the iPad) and the power button (top of the iPad), the screen will flash and take a picture of whatever is on your screen. The iPad will store this in the "Saved Photos" album in the Photos app!
How to delete multiple pictures from the Photo App:
It's a little deceiving to try and delete more than one photo at a time while browsing the Photo App. What you want to do it is click on the Edit button in the top right corner of the photo app. Then, tap on one of the photos you want to delete and checkmark will appear on the photo. Tap on other photos you want to delete Tap the Delete button in the top left to delete.
How to limit students from accessing certain content on the iPad:
There are some obvious reasons why you might want to limit certain applications (perhaps iTunes) while your students use your iPad. If you go to Settings > General > Restrictions > Enable Restrictions. You can select what apps can be accessed after you type in a passcode. While that passcode is setup, those apps won't even display on the screen. To disable this, simply navigate back to this page and enter the passcode.
